
Pore humidifiers offer a solution for dry air, benefiting personal spaces and small rooms up to 175ft².
These devices are ideal for moisturizing air, easing congestion, and improving overall comfort, especially during colder seasons.
A humidifier can be a lifesaver, and understanding how to set it up is crucial for enjoying its benefits.
This comprehensive guide will detail setup, use, and maintenance for optimal performance.
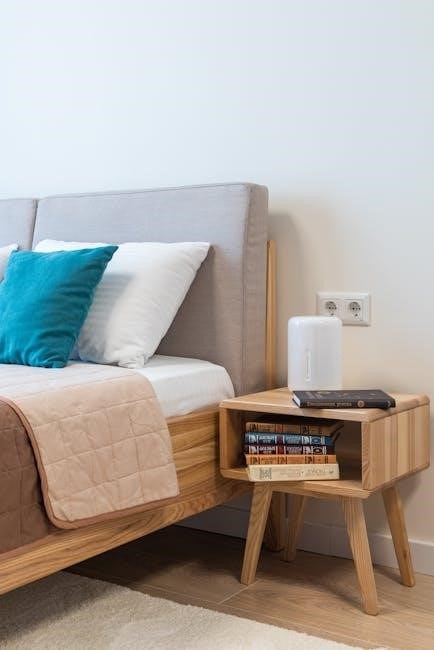
With a large water tank and cool mist nozzle, modern humidifiers like Pure Enrichment models operate quietly, providing relief without disruption.
What is a Pore Humidifier?
A pore humidifier is a device designed to increase humidity levels in a localized area, offering relief from dry air conditions. Unlike traditional humidifiers that service larger spaces, these are typically compact and intended for personal use or smaller rooms – often up to 175 square feet. They function by releasing water vapor into the air, creating a more comfortable and breathable environment.
These humidifiers commonly utilize cool mist technology, dispersing a fine, cool vapor through a nozzle. This method is often preferred for its safety and energy efficiency. The core purpose is to combat dryness, alleviating symptoms like congestion, dry skin, and sinus discomfort. They are particularly beneficial during colder months when heating systems tend to reduce indoor humidity.
Modern pore humidifiers, such as those from Pure Enrichment, are engineered for quiet operation, ensuring minimal disruption. They represent a practical solution for individuals seeking targeted humidity control and improved air quality in their immediate surroundings.
Benefits of Using a Pore Humidifier
Employing a pore humidifier delivers a multitude of benefits, primarily centered around alleviating dryness and improving overall well-being. By adding moisture to the air, these devices can significantly reduce congestion, providing relief from stuffy noses and irritated airways, especially during cold and flu season.
Furthermore, a humidifier combats dry skin, preventing flakiness, itching, and discomfort. It can also soothe irritated sinuses, reducing discomfort and promoting easier breathing. Beyond physical health, maintaining optimal humidity levels can even minimize static electricity, a common nuisance in dry environments.
The quiet operation of models like Pure Enrichment humidifiers ensures a peaceful environment, conducive to better sleep. They are particularly advantageous for personal spaces, creating a more comfortable and healthy atmosphere. Ultimately, a pore humidifier is a simple yet effective tool for enhancing indoor air quality and promoting a more pleasant living experience.
When to Use a Pore Humidifier
A pore humidifier proves most beneficial during periods of low humidity, typically occurring in the winter months when heating systems dry out indoor air. Recognizing the signs of dry air – such as dry skin, chapped lips, and static electricity – signals the ideal time to introduce humidity.
Individuals experiencing congestion, sinus discomfort, or a dry cough will find relief from consistent humidifier use. It’s also advantageous to operate a humidifier while sleeping, particularly if you wake up with a dry throat or nasal passages.
Furthermore, consider using a humidifier when introducing a new baby to a dry environment, as infants are particularly susceptible to the effects of low humidity. Maintaining a comfortable humidity level, especially in personal spaces or smaller rooms up to 175ft², ensures a healthier and more comfortable living environment year-round.

Unboxing and Component Identification
Upon opening, verify all components are present: the humidifier base, water tank, and nozzle. Diagrams illustrate each part, ensuring quick and easy setup for effective use.
Package Contents Checklist
Before beginning, carefully unpack your new pore humidifier and verify all listed components are present. This ensures a smooth setup process and confirms you have everything needed for optimal operation. Your package should include the following:
- Humidifier Base: The main unit housing the internal mechanisms.
- Water Tank: A detachable reservoir for holding the water supply.
- Nozzle: The component responsible for dispersing the cool mist into the air.
- User Manual: This guide provides detailed instructions for setup, operation, and maintenance.
- Power Adapter: Used to connect the humidifier to a standard electrical outlet.
If any items are missing or appear damaged, please contact customer support immediately. Do not attempt to operate the humidifier with missing or damaged parts. Retain the original packaging for potential returns or warranty claims. A complete inventory at this stage will prevent issues later.
Humidifier Base and Water Tank Overview
The humidifier base is the core of the unit, containing the ultrasonic transducer that converts water into a fine mist. Locate the power inlet for the adapter and the connection point for the water tank. Ensure these areas remain dry during operation. The base also houses the control panel, which we’ll explore later.
The water tank is designed for easy removal and refilling. Notice the maximum fill line indicated inside – never exceed this level to prevent leaks. The tank’s underside features a valve that opens when placed on the base, allowing water to flow to the transducer. Inspect the tank for any cracks or damage before each use.
Properly seating the tank onto the base is crucial for operation. A secure connection ensures efficient mist production and prevents water spillage.
Nozzle and Control Panel Explanation
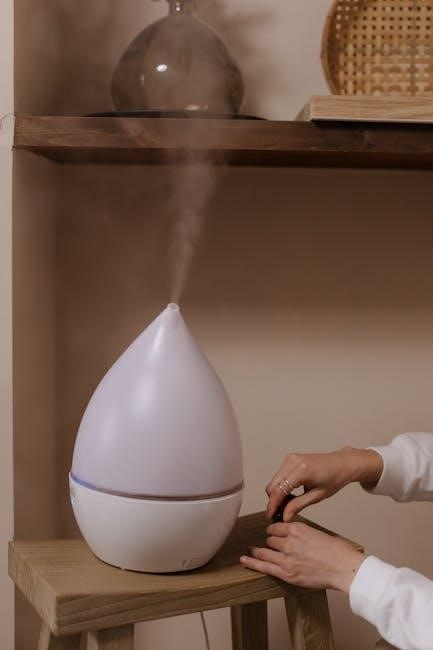
The nozzle directs the cool mist output into the surrounding air. Gently rotate the nozzle to adjust the mist direction, ensuring it’s aimed away from furniture and electronics to prevent moisture damage. Some models feature adjustable mist output levels via the nozzle itself.
The control panel is your interface for operating the humidifier. Typically, it includes a power button, mist level controls (low, medium, high), and timer settings. Familiarize yourself with each button’s function. A power indicator light confirms the unit is on.
Many humidifiers offer an automatic shut-off feature, activated via the timer, enhancing safety and conserving energy. Explore the panel to understand these settings. Refer to the full operating instructions for detailed explanations of each control.

Setting Up Your Pore Humidifier
Setup is quick and easy, but following all instructions ensures safe and effective use. Begin by filling the water tank, plugging in the unit, and setting preferences.
This guide walks you through the process, step by step, to maximize your new investment’s benefits.
Filling the Water Tank
Carefully remove the water tank from the humidifier base. Locate the water tank opening, typically on the bottom or side, and gently unscrew the cap. Using clean, cool tap water or distilled water (recommended for optimal performance and to minimize mineral buildup), slowly fill the tank to the indicated maximum fill line.
Avoid overfilling, as this could lead to leakage. Once filled, securely replace the cap, ensuring a tight seal to prevent spills during operation. Before placing the tank back onto the base, inspect the sealing ring for any damage or debris. A properly seated tank is crucial for efficient mist production and preventing water from escaping.
Always handle the water tank with care, avoiding drops or impacts. Return the filled tank to the humidifier base, aligning it correctly until it clicks or sits firmly in place. Double-check the connection to confirm it’s stable before powering on the device.
Proper Water Type for Humidifiers
Selecting the right water type is vital for maintaining your humidifier’s performance and longevity. While cool tap water can be used, distilled water is strongly recommended. Tap water contains minerals that can accumulate inside the tank and components, leading to scale buildup and potentially reducing mist output.
Distilled water, being virtually mineral-free, minimizes this buildup, ensuring cleaner operation and extending the humidifier’s lifespan. If tap water is used, more frequent cleaning and descaling will be necessary. Avoid using warm or hot water, as it can damage the plastic components and encourage bacterial growth.
Never add any additives, such as essential oils or vapor rubs, directly into the water tank unless specifically instructed by the manufacturer. These substances can clog the humidifier and void the warranty. Prioritizing distilled water is a simple step towards a healthier and more efficient humidifying experience.
Initial Setup and Power Connection
Before the first use, carefully unpack your pore humidifier and ensure all components are present, referencing the package contents checklist. Place the humidifier on a stable, level surface, away from direct sunlight and heat sources. Ensure there’s adequate ventilation around the unit.
Once the water tank is filled with the appropriate water type (distilled is recommended), securely position it onto the humidifier base. Verify it’s properly seated to prevent leaks. Locate the power adapter and plug it into a standard electrical outlet.
Prior to powering on, inspect the power cord for any damage. If damage is present, do not use the humidifier. Setup is quick and easy, but following these instructions ensures safe and effective operation. A properly connected and positioned humidifier is the first step to enjoying its benefits.

Operating Instructions
To operate your pore humidifier, power it on and adjust the mist level to your preference using the control panel. Utilize the timer settings for automatic shut-off.
Direct the nozzle towards the desired area, benefiting from the cool mist output. These features allow for personalized and convenient humidity control.
Powering On and Off
Powering on your pore humidifier is a straightforward process. First, ensure the water tank is properly filled with the appropriate type of water, and securely placed on the base. Locate the power button on the control panel – it’s typically indicated by a universal power symbol. A single press will activate the humidifier, initiating mist production.
You’ll likely observe an indicator light illuminating to confirm operation. Powering off the device is equally simple. Press the same power button once more. The indicator light should extinguish, signifying that the humidifier has ceased operation.
Some models feature automatic shut-off capabilities when the water tank is empty, providing an added layer of safety and convenience. Always unplug the humidifier from the electrical outlet when not in use for extended periods, or during cleaning and maintenance procedures. This practice ensures safety and prolongs the lifespan of your device.
Mist Level Adjustment
Most pore humidifiers offer adjustable mist levels, allowing you to customize the output to suit your needs and the size of the room. Typically, these adjustments are controlled via buttons or a dial on the control panel. Common settings include ‘Low’, ‘Medium’, and ‘High’ mist output.
Adjusting the mist level is crucial for maintaining optimal humidity. Start with a lower setting and gradually increase it until you achieve your desired comfort level. Over-humidifying can lead to condensation and potential mold growth, while insufficient mist may not provide adequate relief from dryness.
Experiment with different settings to find the sweet spot for your environment. Consider factors like room size, ambient temperature, and personal preference. Some advanced models may even feature a ‘Smart’ or ‘Auto’ mode that automatically adjusts the mist level based on the surrounding humidity.
Timer Settings and Automatic Shut-Off
Many pore humidifiers are equipped with convenient timer settings and an automatic shut-off feature, enhancing both convenience and safety. The timer allows you to pre-set the humidifier to run for a specific duration – commonly 2, 4, or 8 hours – before automatically turning off;
Utilizing the timer is particularly useful for nighttime operation, ensuring the humidifier doesn’t run continuously throughout the night. The automatic shut-off function activates when the water tank is empty, preventing damage to the unit and ensuring safe operation.
To set the timer, consult your humidifier’s control panel and select your desired runtime. Always ensure the water tank is adequately filled when using the timer or automatic shut-off features. These features contribute to energy efficiency and peace of mind, allowing you to enjoy the benefits of humidified air without constant monitoring.

Maintenance and Cleaning
Regular maintenance ensures optimal performance and longevity of your pore humidifier. Daily cleaning and scheduled deep cleans are essential for preventing mineral buildup and bacterial growth.
Consistent upkeep guarantees fresh, clean mist and extends the lifespan of your device, providing continued relief from dry air.

Daily Cleaning Procedures
Daily maintenance is crucial for preventing the buildup of mineral deposits and ensuring hygienic operation of your pore humidifier. After each use, unplug the unit and empty any remaining water from the tank. Rinse the tank thoroughly with clean, cool tap water, ensuring all residue is removed.
Wipe down the exterior surfaces of the humidifier base with a soft, damp cloth. Pay particular attention to the nozzle area, as mist droplets can accumulate and harbor bacteria. Avoid using harsh chemicals or abrasive cleaners, as these can damage the plastic components.
Inspect the water tank for any signs of discoloration or slime. If present, a more thorough cleaning may be required. Allow all parts to air dry completely before reassembling and storing the humidifier. This simple routine will significantly contribute to the longevity and performance of your device.
Remember, consistent daily care prevents larger issues and maintains optimal air quality.
Deep Cleaning Schedule (Weekly/Monthly)
Weekly cleaning involves a more detailed sanitation of your pore humidifier. Disassemble the unit, including the water tank, base, and nozzle. Wash all removable parts with a mild dish soap and warm water, using a soft brush to reach crevices. Rinse thoroughly to remove all soap residue.

Monthly cleaning requires addressing mineral buildup. Fill the water tank with a solution of equal parts white vinegar and water. Let it sit for 30-60 minutes to dissolve deposits. Rinse repeatedly with clean water until the vinegar smell is gone.
Inspect the ultrasonic transducer (if applicable) for scaling and gently clean with a soft cloth dampened with vinegar. Ensure all parts are completely dry before reassembly. This prevents mold and bacteria growth, maintaining optimal performance and air quality.
Regular deep cleaning extends the lifespan of your humidifier and ensures healthy operation.
Descaling the Humidifier
Over time, mineral deposits from water can accumulate inside your pore humidifier, reducing its efficiency and potentially causing damage. Descaling removes these deposits, restoring optimal performance. A solution of equal parts white vinegar and water is highly effective.
Empty the water tank and fill it with the vinegar-water mixture. Allow it to sit for 30-60 minutes, or longer for significant buildup. The vinegar dissolves the mineral scale. For stubborn deposits, gently agitate the solution.
After soaking, empty the tank and rinse thoroughly with clean water multiple times until the vinegar odor is completely gone. Pay attention to the ultrasonic transducer, gently cleaning it with a vinegar-dampened cloth if needed.
Regular descaling, ideally monthly, prevents long-term issues and ensures your humidifier continues to deliver clean, moist air efficiently.
Troubleshooting Common Issues
Addressing problems like no mist, leaks, or unusual noises ensures your pore humidifier functions correctly. Regular checks and simple fixes maintain optimal performance and longevity.
Common issues often stem from mineral buildup, improper water levels, or component misalignment, easily resolved with cleaning and adjustments.
This section provides solutions for these frequent concerns, helping you quickly restore your humidifier to its best working condition.
No Mist Output
If your pore humidifier isn’t producing mist, several factors could be at play. First, verify the water tank is adequately filled; the unit won’t operate without sufficient water levels. Ensure the tank is correctly seated on the base, establishing a proper connection for water flow.
Mineral buildup is a frequent culprit. Over time, minerals from tap water can accumulate, obstructing the ultrasonic vibrations responsible for mist creation. Descaling the humidifier (as detailed in the maintenance section) is often the solution.
Check the nozzle for blockages. Gently clean the nozzle opening with a soft cloth or brush to remove any visible debris. Confirm the humidifier is powered on and the mist level is set to a desired output. Inspect the transducer (the vibrating plate) for damage; if visibly compromised, it may require replacement.
Finally, ensure the automatic shut-off hasn’t been triggered due to low water levels. Refilling the tank should resolve this.
Leaking Water
Water leakage from your pore humidifier can be concerning, but is often easily addressed. The most common cause is overfilling the water tank – always adhere to the maximum fill line indicated. Ensure the tank is properly seated on the base; an imperfect fit prevents a watertight seal.
Inspect the tank for cracks or damage. Even small fissures can lead to leaks. If damage is present, the tank may need replacing. Check the rubber gasket (if present) around the tank opening for wear and tear; a damaged gasket won’t create a secure seal.
Verify the humidifier is placed on a level surface. An uneven surface can cause water to slosh and leak. Examine the base for cracks, particularly around the water reservoir. Avoid moving the humidifier while the tank is full.
If leaking persists, carefully dry all components and reassemble, paying close attention to proper alignment.
Unusual Noises
Hearing unusual noises from your pore humidifier is often a sign of a simple issue. A common culprit is low water levels; the unit may gurgle or sputter as it struggles to create mist. Refilling the tank usually resolves this. Ensure the humidifier is placed on a stable, level surface – vibrations can amplify sounds.
Check for obstructions in the water tank. Mineral buildup or debris can cause rattling or buzzing. Regular cleaning and descaling (as outlined in the maintenance section) prevent this. Inspect the fan (if visible) for any obstructions or damage.
Some humming is normal during operation, but excessive noise could indicate a problem with the internal components. If the noise is persistent and loud, discontinue use and contact customer support.
Avoid placing the humidifier near walls or furniture that might vibrate in response to the sound.

Extending the Lifespan of Your Humidifier
Proper storage, filter replacements (if applicable), and avoiding common mistakes are key to longevity. Regular cleaning and descaling prevent buildup, ensuring optimal performance for years.
Consistent maintenance safeguards against issues, maximizing the humidifier’s lifespan and maintaining air quality.
Proper Storage Techniques
When not in use for extended periods, proper storage is crucial for maintaining your pore humidifier’s functionality. Begin by completely emptying the water tank and allowing all components to dry thoroughly. This prevents mold and bacterial growth, which can compromise air quality and damage the unit.
Store the humidifier in a cool, dry place, away from direct sunlight and extreme temperatures. The original packaging is ideal, but a clean, airtight container will also suffice. Ensure the nozzle is unobstructed to prevent deformation.
Avoid storing the humidifier in damp basements or garages, as humidity can encourage microbial growth. Before re-using after storage, inspect all parts for damage and clean thoroughly. Following these steps will help ensure your humidifier is ready to provide clean, moist air whenever you need it.
Remember to disconnect the power cord and store it separately to prevent accidental damage or hazards.
Filter Replacement (If Applicable)
Not all pore humidifiers utilize filters, but those that do require periodic replacement to maintain optimal performance and air quality. Check your humidifier’s manual to determine if your model has a filter and its recommended replacement schedule – typically every 3-6 months, depending on usage and water quality.
Filters trap minerals and impurities from the water, preventing them from being dispersed into the air as white dust. A clogged filter reduces mist output and can harbor bacteria. Replacement filters are usually readily available online or from the manufacturer.
Before installing a new filter, ensure the humidifier is powered off and unplugged. Follow the manufacturer’s instructions for removing the old filter and inserting the new one. Proper filter installation is essential for effective operation.
Regular filter replacement contributes to cleaner, healthier air and extends the lifespan of your humidifier.
Avoiding Common Mistakes
One frequent error is using tap water, which contains minerals that can create white dust and necessitate more frequent cleaning. Always utilize distilled or demineralized water for optimal performance and to prevent mineral buildup within the humidifier.
Neglecting regular cleaning is another common mistake. Daily rinsing and weekly deep cleaning are crucial to prevent bacterial growth and maintain air quality. Ignoring this can lead to unpleasant odors and potential health concerns.
Overfilling the water tank can cause leaks, while underfilling may lead to the humidifier shutting off prematurely. Pay close attention to the water level indicator. Also, avoid placing the humidifier on surfaces that are sensitive to moisture;
Finally, failing to follow the manufacturer’s instructions can void the warranty and compromise the humidifier’s functionality.